 What do you think?? I even got out the sewing machine for this one too!

Monday, 17 December 2007
Rougie Girl
Today is the first day of my Christmas leave and I am enjoying it so much! I did a layout this morning, the first one, of our dog Rouge.
Sunday, 9 December 2007
Yay for Christmas
I have been going crazy over Christmas lately doing OTP stuff. I finished this one a few weeks ago but wasn't sure if I was ready to call it complete until today. It's all ready for photos now and will look a bit more exciting after a bit of layering.


The joke on the last page is:
'20 Easy Steps to Cook a Turkey'
1. Go buy a turkey
2. Take a drink of whisky
3. Put turkey in oven
4. Take another two drinks of whisky
5. Set the degree at 180 ovens
6. Take three more whiskies of drink
7. Turn on the oven
8. Take four whisks of drinky
9. Turk the bastey
10. Whisky another bottle of get
11. Stick a turkey in the thermometer
12. Glass yourself a pour of whisky
13. Bake the whisky for four hours
14. Take the oven out of the turkey
15. Take the oven out of the turkey
16. Floor the turkey up off the pick
17. Turk the carvey
18. Get yourself another scottle of botch
19. Tet the stable and pour yourself a glass of turkey
20. Bless the saying, pass and eat out.
Saturday, 1 December 2007
Bonjour
 Another acetate card... they would have to be the hardest things to photograph!! This one is using the brand new Summer Mini Catalgoue products, French Swirl and Carte Postale. I can't get enough of this background... what can I say, I am a sucker for swirls!
Christmas Tree
 This was an attemp at a Christmas card like I saw Rachael make. Its just a triangle embossed with glassy glaze embossing powder so its ultra thick and then layered on angles. It didn't turn out as well as Rachaels did but it is ok for a first attempt!
Wednesday, 21 November 2007
Secret Santa
I covered this treasure chest tin last night for my boss. I managed to pull her name out of the hat for Secret Santa. At first it seemed like an impossible task but after a few minutes thought I realised that she is probably one of the easier people to buy for in our team!

I also made a little altered paperclip to hold the gift bag closed. She likes wine so I thought this would be a good topper for it! Shhh... no one tell them where I got the paperclip from!

I wrote 'From Cameron' on the gift tag because they all know secretly that it is Cam that comes up with all the pretty cards and scrapbook layouts that keep turning up in the office... he just gives them to me to me before anyone gets in in the morning so they don't think he is odd! He just whips them up in between kite surfing and work! So he says.....
YEAH RIGHT! haha
I also made a little altered paperclip to hold the gift bag closed. She likes wine so I thought this would be a good topper for it! Shhh... no one tell them where I got the paperclip from!
I wrote 'From Cameron' on the gift tag because they all know secretly that it is Cam that comes up with all the pretty cards and scrapbook layouts that keep turning up in the office... he just gives them to me to me before anyone gets in in the morning so they don't think he is odd! He just whips them up in between kite surfing and work! So he says.....
YEAH RIGHT! haha
Sunday, 18 November 2007
An even better drumroll.......
I went to a canvas class yesterday with the lovely Teina and this is what I ended up with!


It's safe to say, I now have an all time fave which I think will be hard to beat! We didn't actually have time to finish the whole canvas in the two hours and I came home with just the background paper, netting and ribbon on it... Matt looked at me a bit odd and said "so then, what were you doing that entire time?".... MEN! Like they need to ask.... we were doing what women do best... chatting! We did get everything completed and just ready to stick down so it really didn't take long to just finish it off when I got home. It was probably better to glue it all down at home where it has time to dry with a book on it rather than being rushed at the class.
The background is made using a gorgeous sheet of paper all strunched up. We put HEAPS of glue all over the canvas and then put the paper down and pressed it into the glue without smoothing it out. Its produces a fantastic effect!!
I just really couldn't be happier with the result! THANKS TEINA!
Just in case... I might ask... is anyone still reading my blog??!! HAHA
Christmas Joy
 I have been pretty busy this week. I have about three projects on the go and I really just need to sit down and actully finish one! I did finish this altered tin in one night so I was pretty proud of that. Its not that it takes a long time to do these things, I usually sit and think about them for ages before actually doing something!
This one was really easy to cover because the latches and handle are held on by little split pin ideas on the inside of the box. It was really easy to just bend them back to take them off, cover the tin then put them back on.
Monday, 12 November 2007
A Special Card
 I made this card tonight for a friend that is going to Brisbane tomorrow to visit her mum who is not well. Hopefully she will like it! These are the gorgeous new stamps that are coming up in the brand new Summer Mini Catalogue on sale in December!
Stamps: French Flair and Carte Postale
Ink: Perfect Plum, Certainly Celery and Pale Plum
Cardstock: Pale Plum, Sage Shadow and Enchante Designer Series Paper
Accessories: 1 1/4" Circle Punch and Stampin' Dimensionals
Saturday, 3 November 2007
A Very Special Stamp Set

Help us honour our friend and Australian Stampin' Up! General Manager, Dave Abbott.
Dave passed away from a rare blood disease in October, leaving behind his wife and 3 young, gorgeous children.
During November Stampin’ Up! are donating 100% of the sales worldwide from the "All in the Family" stamp set to the Dave Abbott Family Fund.
This stamp set retails for $73.95, but for this special cause, I am offering it at the very low price of $59.15 (plus postage). To see more about this promotion click here.
Hoppy Birthday

I JUST LOVE THIS SET! How cute is it?! This is the first card that I have made from Unfrogettable and the more I look at it the more I like it. I wasn't overly keen on it when I first finished it. There are just so many things that you can do with this one... I am going to do more this afternoon!
Stamps: Unfrogettable & Canvas Background
Cardstock: Old Olive, Real Red, More Mustard and Watercolour Paper
Ink: Old Olive, Real Red, More Mustard, Pumpkin Pie, Creamy Caramel and Garden Green
Accessories: Real Red Brads, Real Red Grosgrain Ribbon and Kindy Glitz (doesn't show up in the photo to well)
Friday, 2 November 2007
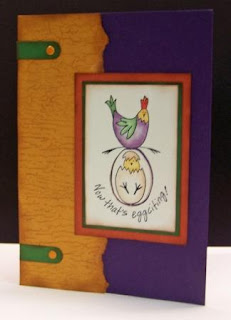
Now That's Eggciting!
This is a spinner card that I made for a friend that was due to have her baby at the time. The little baby girls was born last Thursday so that is pretty eggciting!! I used a card Marelle made as inspiration... its just such a great colour combo!
 The egg spins on a piece of dental floss and has the little chickie inside....
 Stamps: Best of Cluck and Weathered
The egg spins on a piece of dental floss and has the little chickie inside.... Stamps: Best of Cluck and WeatheredCardstock: Elegant Eggplant, More Mustard, Really Rust, Garden Green and Watercolour Paper
Ink: Elegant Eggplant, More Mustard, Really Rust, Garden Green, Close to Cocoa and Creamy Caramel
Accessories: More Mustard Brads, Word Window Punch, Pastels
Sunday, 28 October 2007
So Pretty
I did this layout of Carly last week and I am quite happy with it. The more I look at it the more average it seems but I think thats only becuase I have looked at it millions of times in the last week so now its just familiar to me.

Its really the style I was wanting to do and I was really trying hard just to break away from boring scrapbooking and do something really girly! It came together much easier than I expected and it only took two afternoons.
That was my first attempt at sewing too and surprisingly I did pretty well!! The only corner I did slightly dodgy was one you couldn't see anyway.
Monday, 22 October 2007
OMG!
I did this layout a couple weeks ago but wasn't able to get a good photo of it. Its still not great but I am sick of trying so I just settled!

I had fun doing this one but it took about two weeks. I just stared at it most of the time without any ideas and then one day I just figured I had better do something!
Caleb didn't look overly impressed in these photos which inspired the 'OMG they're making me touch it' title. He just has a little stunned look on his face and in the picture with the frog on his foot he has a tiny tear. Its cute!
Sunday, 7 October 2007
NOW FOR THE DRUM ROLL!!!
WOOHOOOO!! My first layout in this new scrapbooking style that I am trying to beat into me where I don't have to mat everything, where its not always square and where something doesn't have to have a reason to be there!

Oh, I just couldn't be happier with this one! I ordered this kit from Crafting In Style and I just absolutely love it!! I can't take credit for the design because I pretty much just followed the instructions rather than trying my own thing but theirs just looked so good that I wanted to do it similar!!
I was given two VERY valuable pieces of advice last weekend at the La Porchetta Day and I had to keep repeating them in my head the whole time but you know what?.... they helped so much!!
Rachael told me "you have to follow it through, don't make up your mind about a layout until its finished" this is so true Rach and thats one of my biggest problems, I give up before I have finished becuase I think it looks dumb... now I am going to follow through with everything becuase I didn't like this a million times before it was finished and now its one of the best I have ever done!! (the other best being the double layout below!)
Teina told me another really valuable piece of advice (they are both so helpful that I can't pick between them) "JUST CUT IT... there is no point in stressing that you are going to stuff up a piece of paper... just cut it up beucase at the end of the day, its just paper and next week you will find something you like even better!) WELL, Teina, you hit the nail on the head here! My other problem is that I don't like to cut or use my pattern paper in case I ruin it or find another use for it and don't have it anymore.... this is all going to change.... from now on, I'm going to follow Teina's advice and JUST CUT IT!!
THANKS RACHAEL AND TEINA!! You two are just priceless!
LA PORCHETTA DAY!
I went to a scrapbooking class last weekend at La Porchetta (hooray for a free weekend!) and made a single and a double page layout with the ever so talented Rachael! I really envy her ability to just whip wonderful things up as if she was doing something so simple as brushing her teeth!!
 If I ever work out how to get a better pic of that I will try again and update the post!
  Yeah... the more I look at them, the more average these photos look, however, I LOOOOVVVEEE them in real life!!! You may just have to take my word for it!
Here are some pics of the layouts we made..... believe me, the photos are crooked not the paper! I have something in me that is unable to rest until something is straight but when it comes to the photos, I JUST DON'T KNOW HOW TO DO IT!! It drives me nuts! If someone knows the trick to photographing your layouts straight PLEASE tell me... I'll be ya best frieeennnddd................
If I ever work out how to get a better pic of that I will try again and update the post! Yeah... the more I look at them, the more average these photos look, however, I LOOOOVVVEEE them in real life!!! You may just have to take my word for it!
BBQ APRON CHALLENGE!
Its been a while since my last blog and I am very sorry, truth is, I just forgot to come back!! I have just been so busy that I haven't created much at all in the last month. HOORAY FOR FREE TIME!! I have three weeks free now before my next workshop so get ready to see some updates of what I have been up to! I did do the challenge and made two aprons so long ago that I almost forgot about them until I found them yesterday.
Here is the long awaited photo of the BBQ Apron Challenge that I had with Karen! The challenge was to make a girly apron and this is what I came up with... if you would like to see what Karen made click HERE!

Here is the long awaited photo of the BBQ Apron Challenge that I had with Karen! The challenge was to make a girly apron and this is what I came up with... if you would like to see what Karen made click HERE!
 I intended at the time to make another apron to add to the challenge but I just sat staring at paper for ages because surprisingly, its really hard to make it girly... Rachael did a fantastic job though!
While staring at paper and just trying to kill time until inspiration arrived (I don't go looking for it by the way, I just sit patiently until it comes to me... call me lazy!) I made this little Stampin' Up! arpon just becuase I had a logo sitting next to me from a flyer I was working on at the time!
Just for laughs.... its very boring but it killed five minutes so it was amusing at the time.....
Monday, 10 September 2007
THE BBQ APRON CHALLENGE
As you might have read in the comment section of the post below, my friend Karen has set a challenge to make some girly aprons and man am I going to give it a go!!
I am about to sit down and see what I can come up with so stay tuned. I am so excited!!
Post a comment if you would like to join in!
I am about to sit down and see what I can come up with so stay tuned. I am so excited!!
Post a comment if you would like to join in!
Saturday, 8 September 2007
BBQ APRON
 I made this BBQ apron last night and I just love it!!! I was having trouble working out how to do it but Karen was nice enough to clear it up for me. The more I tried to make it unique the more it turned out like hers though. I am going to give some girly aprons a try this weekend and see how I go.
Stamps: Crab and Company and Flannel Plaid
Cardstock: Mellow Moss, Close to Cocoa and Watercolour paper
Ink: Mellow Moss, Regal Rose and More Mustard
Accessories: Close to Cocoa Grosgrain, Always Artichoke Brads, Tag Punch, Close to Cocoa Stampin' Write Marker (for faux stitching)
Tuesday, 28 August 2007
FATHER'S DAY CARDS


I made these cards last night in the hope to work out how to make a decent male card. I am pretty happy with them. I was trying to do a One Sheet Wonder but turns out it just looks like I cut big rectangles of the pattern paper and just used that! Not to worry though, I'm still happy.
Stamps: Whimsical Alphabet and Headline Alphabet
Cardstock: More Mustard, Close to Cocoa, Bashful Blue and a striped pattern paper
Ink: Night of Navy, More Mustard, Jet Black StazOn and Bashful Blue
Accessories: Tag Punch, Linen Thread, Grosgrain Ribbon, Cardboard and Brads
Wednesday, 22 August 2007
JUST CHICKEN IN
 OK I have found a new fave!! I am so proud of this one I made last night! I cased parts of this card from Marelle!
Stamps: Best of Cluck and Weathered
Cardstock: Elegant Eggplant, More Mustard, Garden Green, Really Rust and Watercolour Paper
Ink: Close to Cocoa, Elegant Eggplant, Garden Green, More Mustard, Really Rust and VersaMark
Accessories: More Mustard Eyelets, Linen Thread, Stampin' Pastels and Sponge Daubers
THANKS A BUNCH!
 How cute are the chickies!! This is my first card from Best of Cluck and I made three of these. Two for Thank You cards for a Hostess and a friend and another for me to keep! This will be a great set for Easter next year and I intend on doing the little chickies in all different Easter colours.
Stamps: Best of Cluck and Canvas
Cardstock: Close to Cocoa, So Saffron, More Mustard, Really Rust and Whisper White
Ink: Close to Cocoa, Basic Black, So Saffron, More Mustard and VersaMark
Accessories: Blender Pen, Sponge Daubers and Linen Twine
HOLIDAY GREETINGS
 This card was much the same as the one below. I had a few issues getting ideas and didn't stray far past my tried and tested colour scheme but its cute and thats the main thing! As simple as it is, it still took me ages to think up while I was away from home sweet home.
Stamps: Sleigh Full of Toys and Sincere Salutations
Cardstock: Rose Red, Regal Rose, Confetti White and Watercolour Paper
Ink: Jet Black StazOn, Close to Cocoa, Rose Red, Regal Rose and Whisper White
Accessories: Large Oval Punch and White Organdy Ribbon
SLEIGH FULL OF TOYS
 I love this card, its simple and there are only three colours but it works! I made this one while I was in Townsville on the weekend and it took almost two days to finish. I was having inspiration issues outside of my normal habitat!
Stamps: Sleigh Full of Toys and Looks Like Spring
Cardstock: Regal Rose, Rose Red, Confetti White and Watercolour Paper
Ink: Jet Black StazOn, Regal Rose, Rose Red, Whisper White
Accessories: Blender Pen and Stamp-a-ma-jig
CHRISTMAS ROO
 This is my first little Christmas Roo and I am pretty glad to say... I LOVE HIM!
Stamps: Happy Christmas Mate! and Sleigh Full of Toys
Cardstock: Old Olive, Real Red, Elegant Eggplant and Watercolour Paper
Ink: Close to Cocoa, Real Red, Old Olive, Elegant Eggplant, Ballet Blue, So Saffron and VersaMark
Accessories: Blender Pen, Grosgrain Ribbon
Wednesday, 15 August 2007
COASTER GIFT BOX
 I made this little gift box that holds M&M's and Maltesers for a friend at work called Kachina who is leaving us this week. I wanted to make something that she could take to her new job and put on her desk... she already has a pen holder but if you ask me... this one is way better!!!
I made it using some beer coasters I 'acquired' from Hog's Breath Cafe the other week. The paper is from the Spring Flowers pack of double sided, pattern paper.
Stamps: Looks Like Spring, Whimsical Alphabet
Cardstock: Pretty In Pink, Chocolate Chip, So Saffron and Spring Flowers
Ink: Pretty In Pink and Chocolate Chip
Accessories: Light Pink Grosgrain Ribbon, Spring Flowers Punch
HOLIDAY WISHES
 I used Holiday Wishes for a similar card to the one below. I made them both last night and I was having a few inspiration issues. The red layer has VersaMark pressies stamped all over it.
Stamps: Holiday Wishes
Cardstock: Elegant Eggplant, Real Red, More Mustard and Old Olive.
Ink: Basic Black, Real Red, More Mustard and VersaMark
WARMEST HOLIDAY WISHES
 I made this Christmas card last night with my new stamp set called Holiday Wishes. I have to say, I LOVE Christmas cards simply because you can use great colours. I just love Red and Green.
Stamps: Holiday Wishes
Cardstock: Real Red, Old Olive, More Mustard and Ballet Blue.
Ink: Basic Black, Real Red, More Mustard and VersaMark
Accessories: Blender Pen
Monday, 13 August 2007
HAPPY CHRISTMAS MATE!
 OK so Stampin' Up! went above and beyond to bring us this great stamp set this year... how cool is a surfin' santa?! This set is fantastic.. there is the big guy here and also a gorgeous koala on a candy cane and the cutest kangaroo with arms full of pressies... what more can you want from a Christmas stamp set! Apart from maybe a stamp featuring the original double pluggers and a barbie! OK... yeaaaahh thats goin' too far!
Hmm... I am starting to get slack jawed... I think I will go back to the slightly better spoken English I usually come up with!
Stamps: Happy Christmas Mate! and Canvas Print
Cardstock: Real Red, Ballet Blue, Garden Green and watercolour paper
Ink: Real Red, Ballet Blue, Garden Green, Elegant Eggplant, Creamy Caramel and VersaMark
Accessories: Blender Pen and Real Red Eyelets
LETS HEAR IT FOR CHRISTMAS CARDS!!!
 YES fellow stampers... the season for going stamp crazy is coming and there is no harm in being prepared!! GOOOO CHRISTMAS!! I am feeling so Merry about my new Christmas sets that I will be over Christmas completely by December! This one is using Sleigh Full of Toys... not that we need sleighs in Australia... not to worry though! I used Elegant Eggplant, Real Red and Garden Green on this card and watercoloured using classic ink pads on Stampin' Up! Watercolour paper.
HAPPY BIRTHDAY
 How sweet is this watering can??? It's from the Nice & Easy Notes set that I managed to score for free for being part of the Hooray for Hostesses promotion that is running until September 15! I just LOVED watercolouring it on the Stampin' Up! watercolour paper (its gold that stuff and makes watercolouring SO EASY!) The other colours I used are Ballet Blue, Brilliant Blue, Regal Rose and So Saffron.
Friday, 10 August 2007
LOVE BIRDS
 I made this card for a workshop that I have tomorrow. Its using the Stampin' Write markers to colour different areas of the stamp in Chocolate Chip, Ballet Blue, Rose Red and Pumpkin Pie. I used Print Pattern for the background. Simple but cute.
MANY THANKS
 Ok I realise its been quite a while since I have last posted a card that I have made but the truth is I have been REALLY busy! Last weekend my downline Ruth, and I had a Spring Mini Catalogue Launch and made three cards each for 28 people! It was a huge day and this is one of the cards we made using Bodacious Bouquet and Canvas print. The colours are Elegant Eggplant, Old Olive and So Saffron.
Wednesday, 25 July 2007
JOY FOLD
 My very first attempt at a joy fold card! It worked out well and I am happy with it. I made it for my very first stamping class tomorrow night.
The bow was a pain in the butt though! I had many many many many attempts at tying it so it was straight and just when you think I had got it right.... wrong! I attempted many many many more times. Then I gave up and got my sister to tie it and guess what.... she did it first go!!! So this is the result of a combined effort... the card was me and the bow was Kelly.
If you haven't see a Joy Fold card before it the Rose Red section opens up from the right and then the lighter pink, Regal Rose opens out from the left. The Certainly Celery part is the inside part of the card.
The sentiment is from All Year Cheer I.
A HAPPY HELLO
 This little one was cased from the 06-07 Idea Book & Catalogue. I changed the stamp to be one from Simple Somethings. I am really happy I managed to find another way to use this set. I can't say I have made many cards using it. The cardstock is Elegant Eggplant, Certainly Celery, Lavender Lace and Whisper White. I used Close to Cocoa ink to distress the white and a blender and ink pads in the cardstock colours to watercolour. The sentiment is on the punch from the new tab punch in the Spring Mini catalogue.
I made this for a make-and-take for my class tomorrow night.
ONE SHEET BOX
 For a little box that looks simple it had me stumped for some time! The folding bit was a bit tricky to work out but once I did get it I wondered how it could possibly stumped me for so long! I used Scribble This on So Saffron, Regal Rose, Basic Black cardstock and Certainly Celery, So Saffron, Regal Rose and Rose Red ink. The handle was made using the word window punch.
SHORE DO LOVE YOU
 GOTTA LOVE THE LITTLE SHRIMP! I love this card. I used the word window punch to make the ticket corners and distressed all of the edges of the card stock. The stamp set is Crab & Company and the cardstock colours are Regal Rose, So Saffron, Chocolate Chip and Certainly Celery.
Saturday, 21 July 2007
FRIEND - MAKES IT EASY
 As you could imagine, there is glitter everywhere over the house and me from top to bottom!! I used Scribble This and some bits and pieces from Blooming with Happiness for this card. I clear embossed Craft White ink for the flower, water coloured it using a blender pen and Apricot Appeal and Regal Rose ink then applied heat and stick powder and dazzling diamonds over the whole flower. The cardstock colours are Almost Ameythst, Apricot Appeal, Certainly Celery and Regal Rose.
Friday, 20 July 2007
SNAPPY BIRTHDAY
 So the truth behind this card is I just wanted to use the little shrimp and didn't know what to do with him. Also, you gotta love how when you see people make cards from sea creatures like little crabs and shrimps that they always do them in their cooked colours! The truth behind that is that, well, who wants to see a cute little brown dirt coloured crab!
This is Crab & Co from the Spring Mini Catalogue. This set has so many uses it isn't funny! I used Ballet Blue, Bashful Blue, Whisper White and So Saffron cardstock and water coloured using ink pads and a blender pen.
Monday, 16 July 2007
SANDY CLAWS
 Who doesn't love Sandy Claws! He is so cute and from the new set called Crab and Company in the new Spring Mini Catalogue on sale 1st of August. I used Really Rust ink and a blender pen to colour the little guy in and the cardstock used was Garden Green, Real Red, Really Rust and Whisper White.
Subscribe to:
Posts (Atom)